curl -fsSL https://get.docker.com/ | sudo sh
|
1
2
3
4
5
6
7
8
9
10
11
12
13
14
15
16
17
18
19
20
21
22
23
24
25
26
27
28
29
30
31
32
33
34
35
36
37
38
39
40
41
42
43
44
45
46
47
48
49
50
51
52
|
ubuntu@reds-ubuntu:~$ curl -fsSL https://get.docker.com/ | sudo sh
# Executing docker install script, commit: 26ff363bcf3b3f5a00498ac43694bf1c7d9ce16c
+ sh -c apt-get update -qq >/dev/null
+ sh -c DEBIAN_FRONTEND=noninteractive apt-get install -y -qq apt-transport-https ca-certificates curl >/dev/null
+ sh -c curl -fsSL "https://download.docker.com/linux/ubuntu/gpg" | apt-key add -qq - >/dev/null
Warning: apt-key output should not be parsed (stdout is not a terminal)
+ sh -c echo "deb [arch=amd64] https://download.docker.com/linux/ubuntu focal stable" > /etc/apt/sources.list.d/docker.list
+ sh -c apt-get update -qq >/dev/null
+ [ -n ]
+ sh -c apt-get install -y -qq --no-install-recommends docker-ce >/dev/null
+ sh -c docker version
Client: Docker Engine - Community
Version: 19.03.13
API version: 1.40
Go version: go1.13.15
Git commit: 4484c46d9d
Built: Wed Sep 16 17:02:52 2020
OS/Arch: linux/amd64
Experimental: false
Server: Docker Engine - Community
Engine:
Version: 19.03.13
API version: 1.40 (minimum version 1.12)
Go version: go1.13.15
Git commit: 4484c46d9d
Built: Wed Sep 16 17:01:20 2020
OS/Arch: linux/amd64
Experimental: false
containerd:
Version: 1.3.7
GitCommit: 8fba4e9a7d01810a393d5d25a3621dc101981175
runc:
Version: 1.0.0-rc10
GitCommit: dc9208a3303feef5b3839f4323d9beb36df0a9dd
docker-init:
Version: 0.18.0
GitCommit: fec3683
If you would like to use Docker as a non-root user, you should now consider
adding your user to the "docker" group with something like:
sudo usermod -aG docker your-user
Remember that you will have to log out and back in for this to take effect!
WARNING: Adding a user to the "docker" group will grant the ability to run
containers which can be used to obtain root privileges on the
docker host.
Refer to https://docs.docker.com/engine/security/security/#docker-daemon-attack-surface
for more information.
ubuntu@reds-ubuntu:~$
|
보호되어 있는 글입니다.
내용을 보시려면 비밀번호를 입력하세요.
[Jenkins] Jenkins Install (젠킨스 설치)
환경 : WSL2 ubuntu 20.04.1. LTS
JAVA 설치
|
## JRE 설치
sudo apt-get install openjdk-8-jre
## JDK 설치
sudo apt-get install openjdk-8-jdk
|
JAVA 버젼확인
|
java -version
openjdk version "1.8.0_265"
OpenJDK Runtime Environment (build 1.8.0_265-8u265-b01-0ubuntu2~20.04-b01)
OpenJDK 64-Bit Server VM (build 25.265-b01, mixed mode)
|
JAVA 패스 설정
|
## javac 위치 확인
which javac
/usr/bin/javac
## 실제 위치 확인
readlink -f /usr/bin/javac
/usr/lib/jvm/java-8-openjdk-amd64/bin/javac
## PATH설정 /etc/profile 수정
sudo vi /etc/profile
## /etc/profile 촤하단 추가내용
export JAVA_HOME=/usr/lib/jvm/java-8-openjdk-amd64
export PATH=$JAVA_HOME/bin/:$PATH
export CLASS_PATH=$JAVA_HOME/lib:$CLASS_PATH
## PATH 적용
source /etc/profile
## PATH 확인
echo $JAVA_HOME
/usr/lib/jvm/java-8-openjdk-amd64
|
젠킨스 설치
링크 : pkg.jenkins.io/debian-stable/
|
## 키 추가
wget -q -O - https://pkg.jenkins.io/debian-stable/jenkins.io.key | sudo apt-key add -
## 젠킨스 설치 패키지 설정
sudo vi /etc/apt/sources.list
## source.list 최하단에 내용 추가
deb https://pkg.jenkins.io/debian-stable binary/
## apt update
sudo apt-get update
## 젠킨스 설치
sudo apt-get install jenkins
|
젠킨스 시작
|
## 젠킨스 시작
sudo /etc/init.d/jenkins start
Correct java version found * Starting Jenkins Automation Server jenkins [ OK ] |
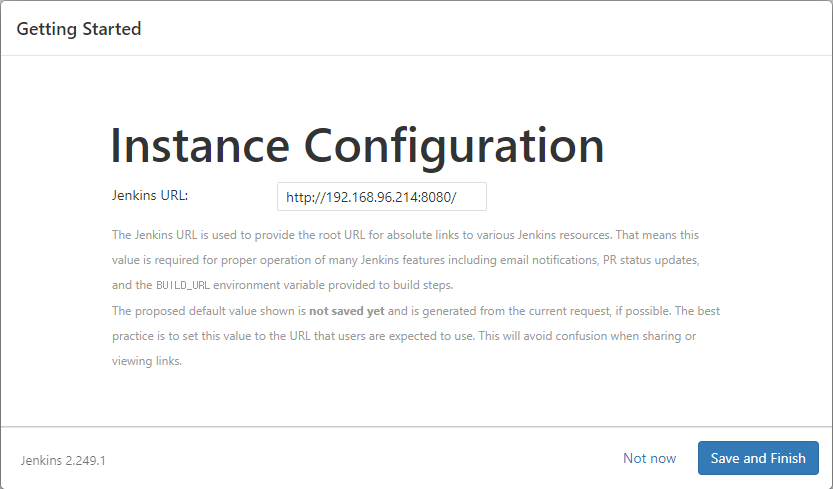
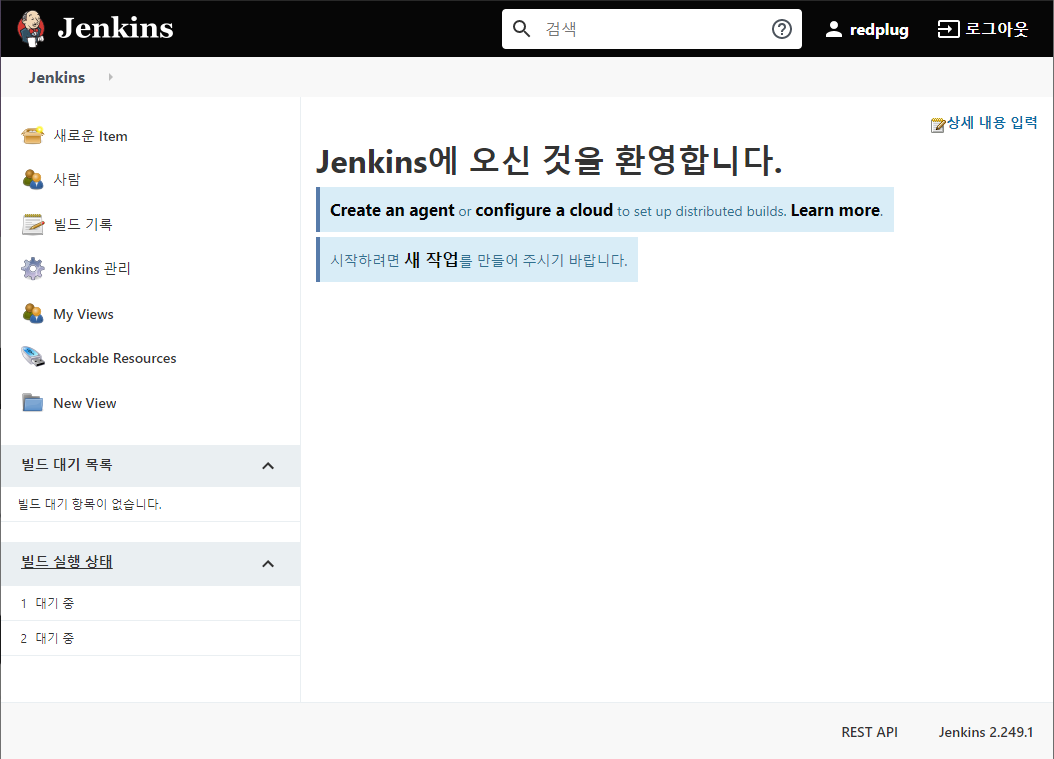
젠킨스 접속
기본포트 8080
http://IP주소:8080 or http://localhost:8080
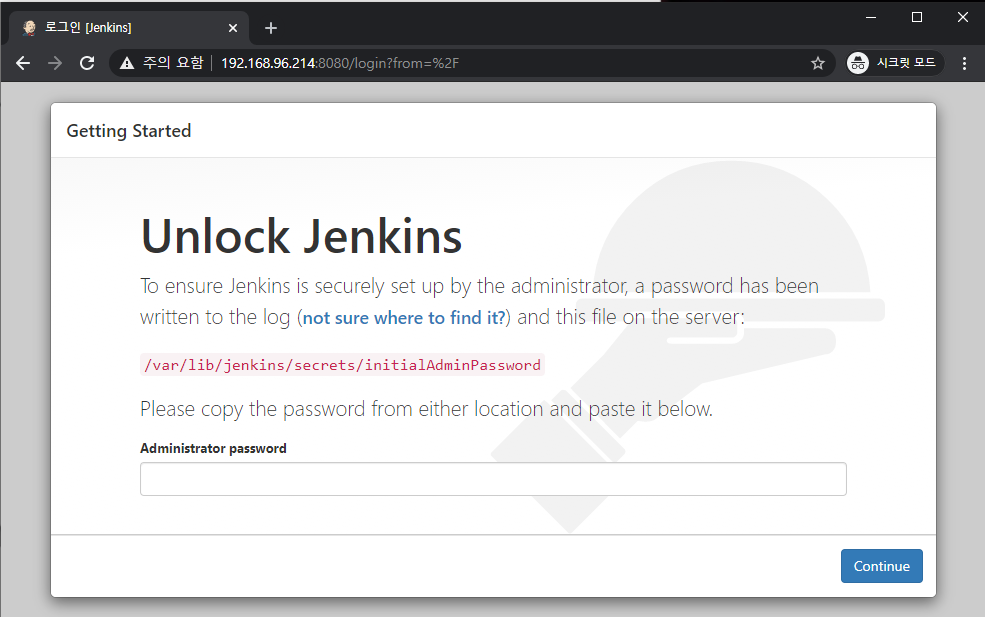
패스워드 확인(하기는 임의값)
|
## Administrator password 확인 후 상기 페이지 입력
sudo cat /var/lib/jenkins/secrets/initialAdminPassword abcdefghijklmn
|

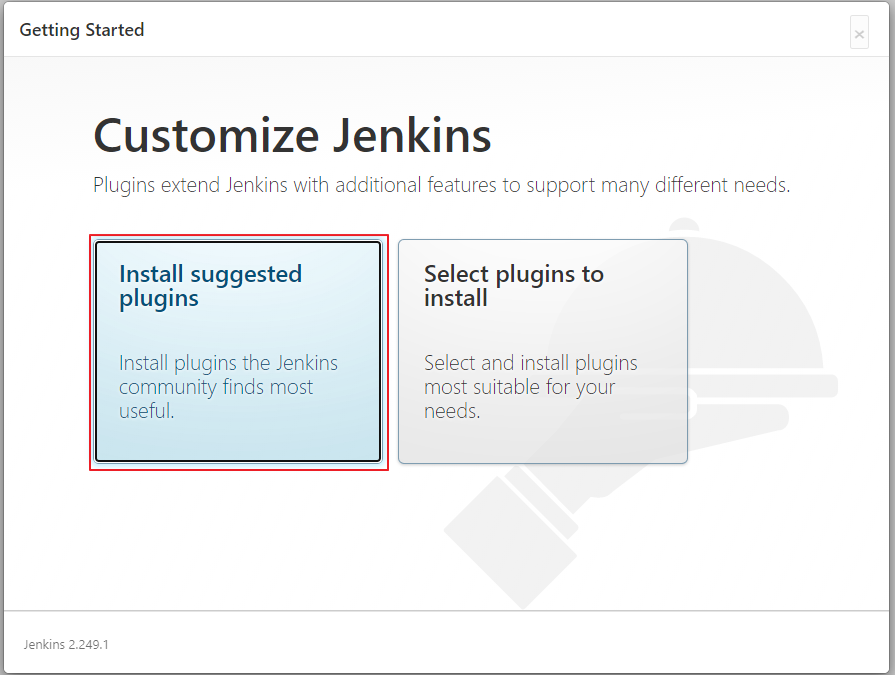
추천 선택
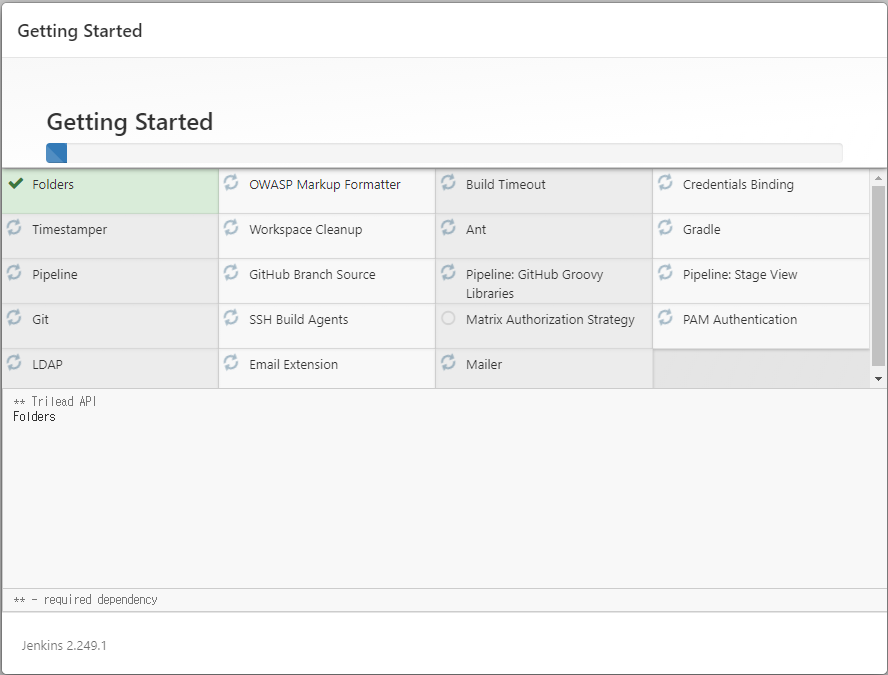
설치화면
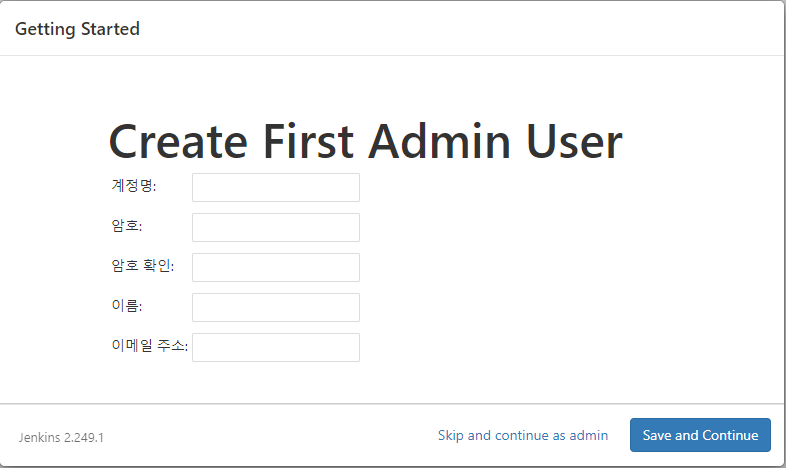
관리자 계정생성
URL 설정
준비
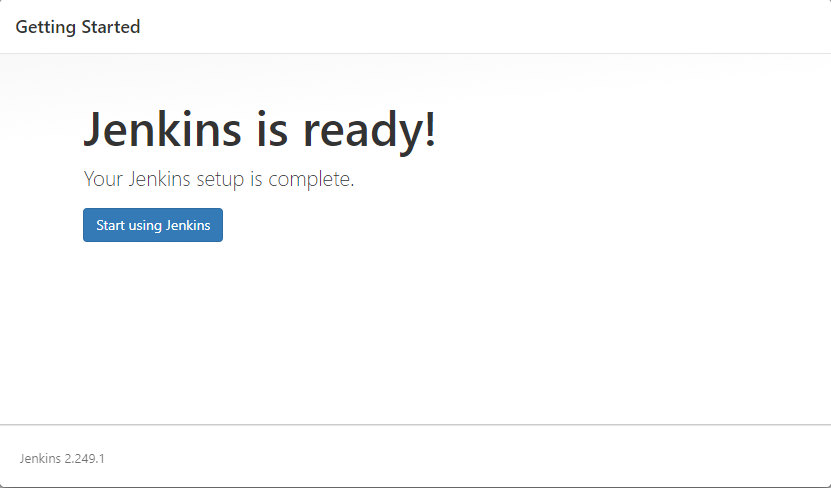
설치완료
자동실행등록
|
sudo chmod +x /etc/init.d/jenkins
sudo update-rc.d jenkins defaults
|
[python] 슬랙봇 간단하게 메시지 보내는 코드
봇으로 간단하게 메시지 보내는 코드
반복이 필요한 경우 crontab을 이용하여 반복 실행한다
# -*- coding: utf-8 -*-
from slacker import Slacker


token = '봇토큰'
slack = Slacker (token)

slack.chat.post_message('#채널명', ":이모지:제목:이모지: \n 내용 \n https://naver.com")
[python] slackbot 밥집 추천 슬랙 봇
밥집 추천 슬랙 봇
- 사전에 봇 등록하여 토큰발급과 event Subscriptions 등록 필요.
- 플라스크를 이용하여 봇에게 멘션이 들어올 경우 밥집을 랜덤하게 리턴해주는 코드
# -*- coding: utf-8 -*-

import json

from slacker import Slacker

from flask import Flask, request, make_response

import random

## 슬랙 봇 토큰 ##
token  = "슬랙봇 토큰"

slack = Slacker(token)

app = Flask(__name__)

def get_answer():
    food = ['밥집1','밥집2','밥집3']
    random.shuffle(food)
    return food


# 이벤트 핸들하는 함수

def event_handler(event_type, slack_event):

    if event_type == "app_mention":

        channel = slack_event["event"]["channel"]

        text = get_answer()

        slack.chat.post_message(channel, "오늘의 밥집 추천은 {text[0]} 입니다")

        return make_response("앱 멘션 메시지가 보내졌습니다.", 200, )

    message = "[%s] 이벤트 핸들러를 찾을 수 없습니다." % event_type

    return make_response(message, 200, {"X-Slack-No-Retry": 1})


@app.route("/slack", methods=["GET", "POST"])

def hears():

    slack_event = json.loads(request.data)

    if "challenge" in slack_event:

        return make_response(slack_event["challenge"], 200, {"content_type": "application/json"})

    if "event" in slack_event:

        event_type = slack_event["event"]["type"]

        return event_handler(event_type, slack_event)

    return make_response("슬랙 요청에 이벤트가 없습니다.", 404, {"X-Slack-No-Retry": 1})


if __name__ == '__main__':

    app.run('0.0.0.0', port=8080)
[Python] 퍼드 티그 자게 크롤링 + 알림
latest 변수와 latest.txt파일에 제목을 비교해서 동일한 값이 아닐 경우 새글이 올라왔어요 + 글제목 + 링크를 함께 텔레그렘 봇이 보내주는 코드
텔레그램 봇 사진 발급 필요.
requests, bs4, telegram봇 모듈 설치 필요.
새글이 있을 경우 텔레그램 봇이 뿌려줌
반복은 crontab을 통해서 원하는 기간별로 진행
#tigpnd.py
# -*- coding: utf-8 -*-

import requests
from bs4 import BeautifulSoup
import os
import time

import telegram


bot = telegram.Bot(token='텔레그램봇토큰')
chat_id = bot.getUpdates()[-1].message.chat.id

BASE_DIR = os.path.dirname(os.path.abspath(__file__))
req = requests.get('https://www.thisisgame.com/pad/tboard/?board=25')
html = req.text
soup = BeautifulSoup(html, 'html.parser')
posts = soup.select('td > a')
latest = posts[14].text
href = posts[14].get('href')
url = 'https://www.thisisgame.com/pad/tboard/'
link = url + str(href)
with open(os.path.join(BASE_DIR, 'latest.txt'), 'r+') as f_read:
    before = f_read.readline()
    if before != latest:
        bot.sendMessage(chat_id=chat_id, text='새 글이 올라왔어요! : ' + latest + link)
    f_read.close()

with open(os.path.join(BASE_DIR, 'latest.txt'), 'w+') as f_write:
    f_write.write(latest)
    print(latest)
f_write.close()Centos7 ifconfig command not found
CentOS7 설치 후 ifconfig 시 command not found가 뜰 경우
yum install net-tools인터넷 불가 시
ip addr 또는 ip link로 확인 가능
Linux 버젼 확인
- 커널 정보
uname -a- OS 버젼 1
cat /etc/issue- OS 버젼 2
cat /etc/redhat-release- OS 버젼 3
cat /etc/*release*OS bit
getconf LONG_BITClient에서 ADUC(Active Directory User & Computer) 접속하기
대상서버 TCP 389 Port Open 필요
1. RSAT 설치
2. runas /u:redplug\admin /netonly "mmc %windir%\system32\dsa.msc /server=IP or DNS"
패스워드 입력
라즈베리파이 Docker 설치
도커 스크립트 다운로드
pi@raspi:~ $ curl -fsSL get.docker.com -o get-docker.sh
pi@raspi:~ $ curl -fsSL get.docker.com -o test-docker.sh
도커 설치(test-docker.sh)
pi@raspi:~ $ bash test-docker.sh
# Executing docker install script, commit: 26ff363bcf3b3f5a00498ac43694bf1c7d9ce16c
+ sudo -E sh -c 'apt-get update -qq >/dev/null'
+ sudo -E sh -c 'DEBIAN_FRONTEND=noninteractive apt-get install -y -qq apt-transport-https ca-certificates curl >/dev/null'
+ sudo -E sh -c 'curl -fsSL "https://download.docker.com/linux/raspbian/gpg" | apt-key add -qq - >/dev/null'
Warning: apt-key output should not be parsed (stdout is not a terminal)
+ sudo -E sh -c 'echo "deb [arch=armhf] https://download.docker.com/linux/raspbian buster stable" > /etc/apt/sources.list.d/docker.list'
+ sudo -E sh -c 'apt-get update -qq >/dev/null'
+ '[' -n '' ']'
+ sudo -E sh -c 'apt-get install -y -qq --no-install-recommends docker-ce >/dev/null'
+ sudo -E sh -c 'docker version'
Client: Docker Engine - Community
 Version:           19.03.12
 API version:       1.40
 Go version:        go1.13.10
 Git commit:        48a6621
 Built:             Mon Jun 22 15:53:41 2020
 OS/Arch:           linux/arm
 Experimental:      false

Server: Docker Engine - Community
 Engine:
  Version:          19.03.12
  API version:      1.40 (minimum version 1.12)
  Go version:       go1.13.10
  Git commit:       48a6621
  Built:            Mon Jun 22 15:47:34 2020
  OS/Arch:          linux/arm
  Experimental:     false
 containerd:
  Version:          1.2.13
  GitCommit:        7ad184331fa3e55e52b890ea95e65ba581ae3429
 runc:
  Version:          1.0.0-rc10
  GitCommit:        dc9208a3303feef5b3839f4323d9beb36df0a9dd
 docker-init:
  Version:          0.18.0
  GitCommit:        fec3683
If you would like to use Docker as a non-root user, you should now consider
adding your user to the "docker" group with something like:

  sudo usermod -aG docker pi

Remember that you will have to log out and back in for this to take effect!

WARNING: Adding a user to the "docker" group will grant the ability to run
         containers which can be used to obtain root privileges on the
         docker host.
         Refer to https://docs.docker.com/engine/security/security/#docker-daemon-attack-surface
         for more information.
구동확인
pi@raspi:~ $ ps auwx|grep docker
root     15755  3.4  1.3 971312 54552 ?        Ssl  11:58   0:00 /usr/bin/docker d -H fd:// --containerd=/run/containerd/containerd.sock
pi       16826  0.0  0.0   4168   480 pts/0    S+   11:58   0:00 grep --color=auto docker
일반 사용자 계정 도커 그룹에 넣기
pi@raspi:~ $ sudo usermod -aG docker pi
hello-world 도커 실행
pi@raspi:~ $ docker run hello-world
Unable to find image 'hello-world:latest' locally
latest: Pulling from library/hello-world
4ee5c797bcd7: Pull complete
Digest: sha256:d58e752213a51785838f9eed2b7a498ffa1cb3aa7f946dda11af39286c3db9a9
Status: Downloaded newer image for hello-world:latest

Hello from Docker!
This message shows that your installation appears to be working correctly.

To generate this message, Docker took the following steps:
 1. The Docker client contacted the Docker daemon.
 2. The Docker daemon pulled the "hello-world" image from the Docker Hub.
    (arm32v7)
 3. The Docker daemon created a new container from that image which runs the
    executable that produces the output you are currently reading.
 4. The Docker daemon streamed that output to the Docker client, which sent it
    to your terminal.

To try something more ambitious, you can run an Ubuntu container with:
 $ docker run -it ubuntu bash

Share images, automate workflows, and more with a free Docker ID:
 https://hub.docker.com/

For more examples and ideas, visit:
 https://docs.docker.com/get-started/
