그룹정책 소프트웨어 설치 패키지 위치 변경
소프트웨어 배포를 위해 설정 했던 그룹정책의 배포 원본 경로를 변경 하는 방법을 설명합니다.
기존 배포 지점 확인

해당 변경하고자 하는 소프트웨어의 속성 > 배포 > 고급 >스크립트 이름에서 Polices 다음 값(클래스ID)를 확인

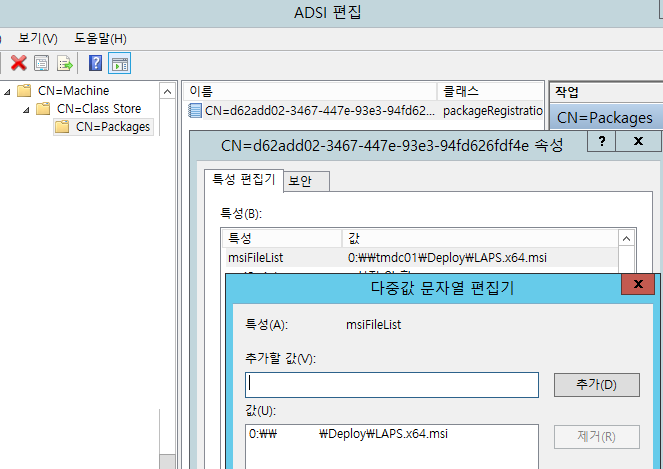
ADSI 편집 > 기본 명명 컨텍스트 > System > Policies > 상기 클래스ID > Machine > Class Store > Packages > 우측에 나오는 값 속성 > 특성 편집기에서 msiFileList 값 수정
수정 시 UNC경로 앞에 0:을 붙여서 추가 한 후에 기존 패키지 주소는 삭제 하면됩니다.
(패키지 수정탭에 내용이 있을 경우 1:이 추가로 표시될 수 있음.)
정책 새로 고침 후 변경사항 확인
Search-Mailbox SearchQuery
1. 서치 할 경우
| Search-Mailbox -identity "redplug" -SearchQuery 'kind:meetings AND Subject:"미팅제목" AND sent:08/27/2019..01/01/2020"' -TargetMailbox redtest -TargetFolder "받은 편지함" |
* AND는 대문자로 작성하여야 함.
* 서치한 결과 값이 Targetmailbox에 저장, PST 지정도 가능(?)
2. 삭제 할 경우
| Search-Mailbox -identity "redplug" -SearchQuery 'kind:meetings AND Subject:"미팅제목" AND sent:08/27/2019..01/01/2020"' -DeleteContent |
쿼리 속성 값 관련 정리 되있는 링크
Search-Mailbox (Exchange 2013, 2016, 2019, Online): Attributes
https://www.codetwo.com/admins-blog/search-mailbox-exchange-2013-2016-online-attributes/
원래 목적은 특정시점 이후에 대한 등록 된 캘린더 삭제를 하고 싶어서 확인 한 사항이었으나
일정이 아닌 등록한 시점으로 서치 및 삭제가 가능 하여 사용불가.
추가로 확인해보니 Remove-CalendarEvents cmdlet가 있었으나 Online만 지원하는 것으로 파악되서 사용하지 못함.(Exchange 2019 지원되는 것 같으나 미확인)
Open Distro for Elasticsearch LDAP 연동
Redplug입니다.
Elasticsearch 사용 시 LDAP연동을 통한 권한 관리를 하기 위한 LDAP 연동 테스트 진행
Open Distro for Elasticsearch는 하기 4가지 케이스에 사용된다고 합니다.
- Log analytics
- Real-time application monitoring
- Clickstream analytics
- Search backend
설치 참고한 가이드
https://opendistro.github.io/for-elasticsearch-docs/docs/install/rpm/
OS는 CentOS7입니다.
1. repository 추가
|
cd /etc/yum.repos.d/ sudo curl https://d3g5vo6xdbdb9a.cloudfront.net/yum/opendistroforelasticsearch-artifacts.repo -o opendistroforelasticsearch-artifacts.repo
|
2 JAVA 설치 (1.8설치)
| sudo yum install java-1.8.0-openjdk-devel |
3. 사용 가능한 Open Distro for Elasticsearch 버젼 확인
| sudo yum list opendistroforelasticsearch --showduplicates |
4. Open Distro for Elasticsearch 설치 진행
설치 시점엔 1.1.0-1로 해당 버젼 설치
Elasticsearch + Open Distor for Elasticsearch 같이 설치 됩니다. (..이걸 몰라서 좀 삽질했습니다.)
이미 Elasticsearch가 설치 되있을 경우 Standalone Elasticsearch Plugin Install 사용하여 설치 진행
| sudo yum install opendistroforelasticsearch-1.1.0-1 |
5. 심볼릭 링크 생성 (JAVA 8일경우)
| sudo ln -s /usr/lib/jvm/java-1.8.0/lib/tools.jar /usr/share/elasticsearch/lib/ |
6. Elasticsearch 서비스 시작
| sudo systemctl start elasticsearch.service |
7. Elasticsearch 테스트
|
curl -XGET https://localhost:9200 -u admin:admin --insecure 하기와 같이 노출되면 Running중 |
8. LDAP 연동
https://opendistro.github.io/for-elasticsearch-docs/docs/security-configuration/ldap/
plugins/opendistro_security/securityconfig/config.yml 파일 수정
기본주소
/usr/share/elasticsearch/plugins/opendistro_security/securityconfig/config.yml
config 파일은 authc부분과 authz로 부분으로 이루어져 있으며,
authc는 인증, authz는 권한 관련된 사항을 정의 합니다.
인증 테스트 이기 때문에 authc 부분만 설정합니다.
샘플파일
|
authc: |
설정 후 Security 적용
https://opendistro.github.io/for-elasticsearch-docs/docs/security-configuration/security-admin/
| sudo /usr/share/elasticsearch/plugins/opendistro_security/tools/securityadmin.sh -cacert /etc/elasticsearch/root-ca.pem -cert /etc/elasticsearch/kirk.pem -key /etc/elasticsearch/kirk-key.pem -cd /usr/share/elasticsearch/plugins/opendistro_security/securityconfig/ |
로그인 시도 화면
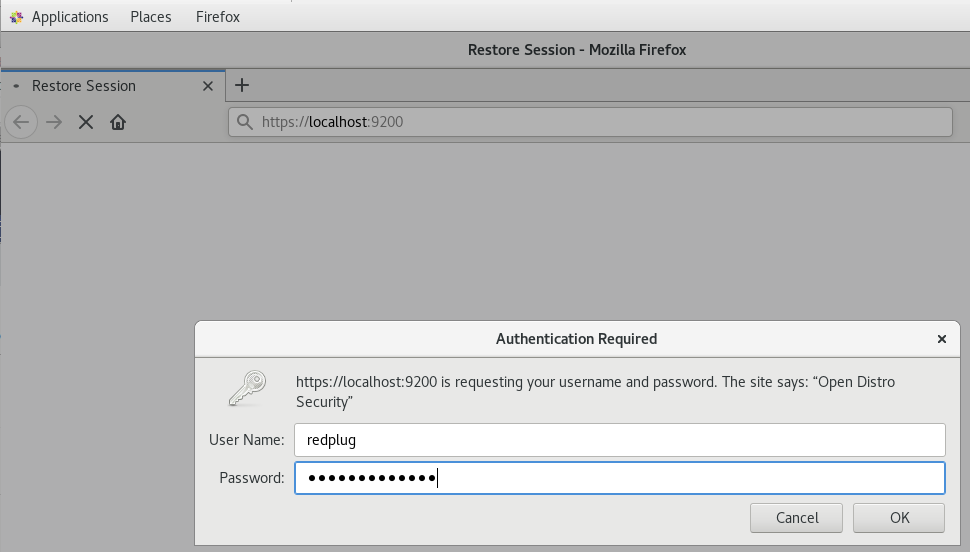
로그인 성공 확인

Elasticsearch Install
LDAP 연동 테스트용으로 설치 진행
1. CentOS 7 설치
- Hyper-V 로 구성
- 2세대, 설정에서 보안부팅 사용 X
- Root 계정 외 별도 계정사용(root로 Elasticsearch 실행불가)
2. 네트워크 설정 (고정IP)
- 계정 로그인 후 이더넷 장치 확인
| [redplug@localhost ~]$ nmcli d DEVICE TYPE STATE CONNECTION eth0 ethernet disconnected eth0 lo loopback unmanaged -- |
- 고정IP 설정
|
[redplug@localhost ~]$ sudo vi /etc/sysconfig/network-scripts/ifcfg-eth0 # 네트워크 재시작 systemctl restart network |
3. Elasticsearch 설치
- Import the Elasticsearch PGP Key
| [redplug@localhost ~]$ sudo rpm --import https://artifacts.elastic.co/GPG-KEY-elasticsearch [redplug@localhost ~]$ |
- Installing from the RPM repository
레파지토리 추가
|
[redplug@localhost /]$ sudo vi /etc/yum.repos.d/elasticsearch.repo [elasticsearch-7.x]
|
- Elasticsearch 설치
| sudo yum install elasticsearch[redplug@localhost /]$ sudo yum install elasticsearch Loaded plugins: fastestmirror base | 3.6 kB 00:00:00 esticsearch-7.x | 1.3 kB 00:00:00 extras | 3.4 kB 00:00:00 updates | 3.4 kB 00:00:00 (1/5): extras/7/x86_64/primary_db | 215 kB 00:00:00 (2/5): base/7/x86_64/group_gz | 166 kB 00:00:00 (3/5): base/7/x86_64/primary_db | 6.0 MB 00:00:00 (4/5): updates/7/x86_64/primary_db | 7.4 MB 00:00:00 (5/5): esticsearch-7.x/primary | 43 kB 00:00:01 Determining fastest mirrors * base: mirror.navercorp.com * extras: mirror.navercorp.com * updates: mirror.navercorp.com esticsearch-7.x 119/119 Resolving Dependencies --> Running transaction check ---> Package elasticsearch.x86_64 0:7.3.0-1 will be installed --> Finished Dependency Resolution Dependencies Resolved =============================================================================================================== Package Arch Version Repository Size =============================================================================================================== Installing: elasticsearch x86_64 7.3.0-1 esticsearch-7.x 271 M Transaction Summary =============================================================================================================== Install 1 Package Total download size: 271 M Installed size: 457 M Is this ok [y/d/N]: y Downloading packages: elasticsearch-7.3.0-x86_64.rpm | 271 MB 00:01:14 Running transaction check Running transaction test Transaction test succeeded Running transaction Creating elasticsearch group... OK Creating elasticsearch user... OK Installing : elasticsearch-7.3.0-1.x86_64 1/1 ### NOT starting on installation, please execute the following statements to configure elasticsearch service to start automatically using systemd sudo systemctl daemon-reload sudo systemctl enable elasticsearch.service ### You can start elasticsearch service by executing sudo systemctl start elasticsearch.service Created elasticsearch keystore in /etc/elasticsearch Verifying : elasticsearch-7.3.0-1.x86_64 1/1 Installed: elasticsearch.x86_64 0:7.3.0-1 Complete! |
- Elasticsearch 실행
| [redplug@localhost /]$ sudo systemctl enable elasticsearch.service Created symlink from /etc/systemd/system/multi-user.target.wants/elasticsearch.service to /usr/lib/systemd/system/elasticsearch.service. [redplug@localhost /]$ [redplug@localhost /]$ sudo service elasticsearch start Starting elasticsearch (via systemctl): [ OK ] |
- 실행 확인
하기와 같이 화면이 노출되면 정상적으로 실행
| [redplug@localhost /]$ curl -XGET 127.0.0.1:9200 { "name" : "localhost.localdomain", "cluster_name" : "elasticsearch", "cluster_uuid" : "KR5xkBUJRwqrBdETyAJoqg", "version" : { "number" : "7.3.0", "build_flavor" : "default", "build_type" : "rpm", "build_hash" : "de777fa", "build_date" : "2019-07-24T18:30:11.767338Z", "build_snapshot" : false, "lucene_version" : "8.1.0", "minimum_wire_compatibility_version" : "6.8.0", "minimum_index_compatibility_version" : "6.0.0-beta1" }, "tagline" : "You Know, for Search" } [redplug@localhost /]$ |
4. 외부 접근 허용
elasticsearch.yml 파일 수정 후 서비스 재시작
|
[redplug@localhost /]$ sudo vi /etc/elasticsearch/elasticsearch.yml # ---------------------------------- Network -----------------------------------
[redplug@localhost /]$ sudo service elasticsearch restart
|
Exchange Mail Queue Check
| for(){get-date;get-queueDigest -dag dagName | ft;sleep 60} |
특정 범위 내에 있는 큐 상태를 집계해서 보여줌 10개 이상 포함된 배달 큐를 표시, 문제 있는 DB에 대해서 종합해서 보기 편함.
|
for() {get-exchangeserver | Where-Object {$_.ServerRole -eq "Mailbox, ClientAccess"} | get-queue -Filter {MessageCount -gt 10} | ft;sleep 60} Get-Queue -Server Mailbox01 -Exclude Empty
|
각 서버 별로 개별적으로 전체적인 현황을 보기위함. 필요에 따라 필터링 가능 QueueDigest보다 상세하게 표기 됨.
Get-QueueDigest Microsoft Docs
Comodo > Sectigo 브랜드명 변경
https://sectigo.com/sectigo-story-faq
Comodo CA Is Now Sectigo
Comodo CA, the largest commercial Certificate Authority in the world, has been rebranded to Sectigo.
sectigo.com
https://www.yna.co.kr/view/AKR20181105045700009
[PRNewswire] 코모도CA, 섹티고로 사명 변경 | 연합뉴스
[PRNewswire] 코모도CA, 섹티고로 사명 변경, 최정환2기자, 국제뉴스 (송고시간 2018-11-05 10:13)
www.yna.co.kr
브랜딩만 바꾸고 기존 인증서 라인은 그대로 이용가능
기존 인증서 사용에 별도로 이슈사항 없음
Outlook 2016 복사시 본문내용이 공백으로 혹은 첨부파일이 0byte로 표시되는 경우
Outlok 2016 초기 버젼 문제로 패치 시 해결 가능
https://www.microsoft.com/ko-kr/download/details.aspx?id=53770
https://www.microsoft.com/ko-kr/download/details.aspx?id=53789
Remote Deskotp(원격 데스크톱) 수신 포트 변경
regedit > HKEY_LOCAL_MACHINE\System\CurrentControlSet\Control\Terminal Server\WinStations\RDP-Tcp\PortNumber
> 상기 값을 원하는 값으로 변경(변경 시 10진수로 변경)
변경 후 재부팅 필요.
커맨드
REG add "HKLM\SYSTEM\CurrentControlSet\Control\Terminal Server\WinStations\RDP-Tcp" /v PortNumber /t REG_DWORD /d 7067 /f
현재 설정 포트 확인
| for /f "tokens=3" %F in ('reg query "HKEY_LOCAL_MACHINE\System\CurrentControlSet\Control\Terminal Server\WinStations\RDP-Tcp" /v PortNumber ^| find "REG_DWORD"') do set /a decval=%F |
| C:\Users\redplug>for /f "tokens=3" %F in ('reg query "HKEY_LOCAL_MACHINE\System\CurrentControlSet\Control\Terminal Server\WinStations\RDP-Tcp" /v PortNumber ^| find "REG_DWORD"') do set /a decval=%F C:\Users\redplug>set /a decval=0x1b9b 7067 C:\Users\redplug> |
방화벽추가
netsh advfirewall firewall add rule name="RDP 7067 TCP Allow" dir=in action=allow enable=yes profile=any protocol=tcp localport=7067
@작업용(관리자 권한으로 실행 필요)
|
:: 현재 RDP Port Check ::
|
출처 : https://support.microsoft.com/ko-kr/help/306759/how-to-change-the-listening-port-for-remote-desktop
OWA(Outlook Web Access) 에서 메일(eml) 다운로드 받기
Exchange 2013 기준입니다.
Outlook을 사용할 경우 드래그로 간단하게 메일 다운로드가 가능하나
OWA상에서는 다운로드가 어렵습니다.
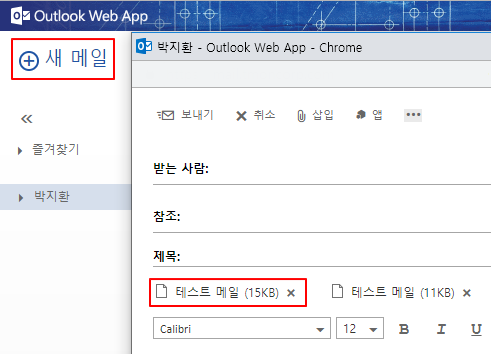
하기는 다운로드 하는 방법을 설명합니다.
OWA > 새 메일 > 우측 상단에 "별도 창에서 열기" 를 이용하여 창을 분리 > 첨부하고자 하는 메일을 새 메일 창에 드래그 앤 드롭 > 해당 첨부파일을 우클릭 "다른 이름으로 링크 저장" > 저장 시 확장자는 eml로 저장
감사합니다.
AD Group Policy 사용자 그룹정책 프로그램 배포 샘플
Active Directory Group Policy 내 사용자 그룹 정책(Logon정책)으로 배포하기 위한 스크립트 샘플
| @echo off title Program install chk. echo Windows 10 Check ver | find "10.0" > nul if %ERRORLEVEL% == 0 goto start goto end :start echo Program Install chk IF NOT EXIST "C:\Program Files\Program\redplug\redplug.exe" ( GOTO :filecopy ) ELSE ( del C:\ProgramData\setup64.exe rd c:\ProgramData\ProgramInstall GOTO :end ) :filecopy echo Program file copy IF EXIST c:\ProgramData\ProgramInstall\setup64.exe GOTO :install md c:\ProgramData\ProgramInstall copy \\filesever\redplug\setup64.exe c:\ProgramData\ProgramInstall :install echo Program file copy OK call c:\ProgramData\ProgramInstall\setup64.exe /s /v"/qb" :end @echo success echo Program chk end |
필요한경우 bits를 이용해 http로도 다운로드를 변경해서 사용이 가능
bitsadmin.exe /transfer "Filedownload" http://downloadsite.com/downloadfile.exe c:\ProgramData\ProgramInstall\downloadfile.exe
